Thursday, December 14, 2017

HTML Links

Links are found in nearly all web pages. Links allow users to click their way from page to page.

HTML Links - Hyperlinks

HTML links are hyperlinks.
You can click on a link and jump to another document.
When you move the mouse over a link, the mouse arrow will turn into a little hand.
Note: A link does not have to be text. It can be an image or any other HTML element.

HTML Links - Syntax

In HTML, links are defined with the <a> tag:
<a href="url">link text</a>

Example

<a href="https://www.w3schools.com/html/">Visit our HTML tutorial</a>
The href attribute specifies the destination address (https://www.w3schools.com/html/) of the link.
The link text is the visible part (Visit our HTML tutorial).
Clicking on the link text will send you to the specified address.
Note: Without a forward slash on subfolder addresses, you might generate two requests to the server. Many servers will automatically add a forward slash to the address, and then create a new request.

Local Links

The example above used an absolute URL (A full web address).
A local link (link to the same web site) is specified with a relative URL (without http://www....).

Example

<a href="html_images.asp">HTML Images</a>


HTML Link Colors

By default, a link will appear like this (in all browsers):
  • An unvisited link is underlined and blue
  • A visited link is underlined and purple
  • An active link is underlined and red
You can change the default colors, by using styles:

Example

<style>
a:link {
    color: green;
    background-color: transparent;
    text-decoration: none;
}

a:visited {
    color: pink;
    background-color: transparent;
    text-decoration: none;
}

a:hover {
    color: red;
    background-color: transparent;
    text-decoration: underline;
}

a:active {
    color: yellow;
    background-color: transparent;
    text-decoration: underline;
}
</style>

HTML Links - The target Attribute

The target attribute specifies where to open the linked document.
The target attribute can have one of the following values:
  • _blank - Opens the linked document in a new window or tab
  • _self - Opens the linked document in the same window/tab as it was clicked (this is default)
  • _parent - Opens the linked document in the parent frame
  • _top - Opens the linked document in the full body of the window
  • framename - Opens the linked document in a named frame
This example will open the linked document in a new browser window/tab:

Example

<a href="https://www.w3schools.com/" target="_blank">Visit W3Schools!</a>
Tip: If your webpage is locked in a frame, you can use target="_top" to break out of the frame:

Example

<a href="https://www.w3schools.com/html/" target="_top">HTML5 tutorial!</a>

HTML Links - Image as Link

It is common to use images as links:

Example

<a href="default.asp">
  <img src="smiley.gif" alt="HTML tutorial" style="width:42px;height:42px;border:0;">
</a>
Note: border:0; is added to prevent IE9 (and earlier) from displaying a border around the image (when the image is a link).

HTML Links - Create a Bookmark

HTML bookmarks are used to allow readers to jump to specific parts of a Web page.
Bookmarks can be useful if your webpage is very long.
To make a bookmark, you must first create the bookmark, and then add a link to it.
When the link is clicked, the page will scroll to the location with the bookmark.

Example

First, create a bookmark with the id attribute:
<h2 id="C4">Chapter 4</h2>
Then, add a link to the bookmark ("Jump to Chapter 4"), from within the same page:
<a href="#C4">Jump to Chapter 4</a>
Or, add a link to the bookmark ("Jump to Chapter 4"), from another page:

Example

<a href="html_demo.html#C4">Jump to Chapter 4</a>

External Paths

External pages can be referenced with a full URL or with a path relative to the current web page.
This example uses a full URL to link to a web page:

Example

<a href="https://www.w3schools.com/html/default.asp">HTML tutorial</a>
This example links to a page located in the html folder on the current web site:

Example

<a href="/html/default.asp">HTML tutorial</a>
This example links to a page located in the same folder as the current page:

Example

<a href="default.asp">HTML tutorial</a>
You can read more about file paths in the chapter HTML File Paths.

Chapter Summary

  • Use the <a> element to define a link
  • Use the href attribute to define the link address
  • Use the target attribute to define where to open the linked document
  • Use the <img> element (inside <a>) to use an image as a link
  • Use the id attribute (id="value") to define bookmarks in a page
  • Use the href attribute (href="#value") to link to the bookmark

Sunday, September 10, 2017

HTML5: you can "teach" older browsers to handle "unknown" HTML elements.

You can teach older browsers to handle HTML5 correctly.

HTML5 Browser Support

HTML5 is supported in all modern browsers.
In addition, all browsers, old and new, automatically handle unrecognized elements as inline elements.
Because of this, you can "teach" older browsers to handle "unknown" HTML elements.
You can even teach IE6 (Windows XP 2001) how to handle unknown HTML elements.

Define Semantic Elements as Block Elements

HTML5 defines eight new semantic elements. All these are block-level elements.
To secure correct behavior in older browsers, you can set the CSS display property for these HTML elements to block:
header, section, footer, aside, nav, main, article, figure {
    display: block;
}

Add New Elements to HTML

You can also add new elements to an HTML page with a browser trick.
This example adds a new element called <myHero> to an HTML page, and defines a style for it:

Example

<!DOCTYPE html>
<html>
<head>
  <script>document.createElement("myHero")</script>
  <style>
  myHero {
      display: block;
      background-color: #dddddd;
      padding: 50px;
      font-size: 30px;
 
}
 
</style>
</head>
<body>

<h1>A Heading</h1>
<myHero>My Hero Element</myHero>

</body>
</html>
The JavaScript statement document.createElement("myHero") is needed to create a new element in IE 9, and earlier.


Problem With Internet Explorer 8

You could use the solution described above for all new HTML5 elements.
However, IE8 (and earlier) does not allow styling of unknown elements!
Thankfully, Sjoerd Visscher created the HTML5Shiv! The HTML5Shiv is a JavaScript workaround to enable styling of HTML5 elements in versions of Internet Explorer prior to version 9.
You will require the HTML5shiv to provide compatibility for IE Browsers older than IE 9.

HTML5 Introduction

What is New in HTML5?

The DOCTYPE declaration for HTML5 is very simple:
<!DOCTYPE html>
The character encoding (charset) declaration is also very simple:
<meta charset="UTF-8">

HTML5 Example:

<!DOCTYPE html>
<html>
<head>
<meta charset="UTF-8">
<title>Title of the document</title>
</head>

<body>
Content of the document......
</body>

</html>
The default character encoding in HTML5 is UTF-8.

New HTML5 Elements

The most interesting new HTML5 elements are:
New semantic elements like <header>, <footer>, <article>, and <section>.
New attributes of form elements like number, date, time, calendar, and range.
New graphic elements: <svg> and <canvas>.
New multimedia elements: <audio> and <video>.
In the next chapter, HTML5 Support, you will learn how to "teach" older browsers to handle "unknown" (new) HTML elements.


New HTML5 API's (Application Programming Interfaces)

The most interesting new API's in HTML5 are:
  • HTML Geolocation
  • HTML Drag and Drop
  • HTML Local Storage
  • HTML Application Cache
  • HTML Web Workers
  • HTML SSE
Tip: HTML Local storage is a powerful replacement for cookies.

Removed Elements in HTML5

The following HTML4 elements have been removed in HTML5:
Removed Element Use Instead
<acronym> <abbr>
<applet> <object>
<basefont> CSS
<big> CSS
<center> CSS
<dir> <ul>
<font> CSS
<frame>  
<frameset>  
<noframes>  
<strike> CSS, <s>, or <del>
<tt> CSS
In the chapter HTML5 Migration, you will learn how to easily migrate from HTML4 to HTML5.

HTML History

Since the early days of the World Wide Web, there have been many versions of HTML:
Year Version
1989 Tim Berners-Lee invented www
1991 Tim Berners-Lee invented HTML
1993 Dave Raggett drafted HTML+
1995 HTML Working Group defined HTML 2.0
1997 W3C Recommendation: HTML 3.2
1999 W3C Recommendation: HTML 4.01
2000 W3C Recommendation: XHTML 1.0
2008 WHATWG HTML5 First Public Draft
2012 WHATWG HTML5 Living Standard
2014 W3C Recommendation: HTML5
2016 W3C Candidate Recommendation: HTML 5.1
From 1991 to 1999, HTML developed from version 1 to version 4. 
In year 2000, the World Wide Web Consortium (W3C) recommended XHTML 1.0. The XHTML syntax was strict, and the developers were forced to write valid and "well-formed" code.
In 2004, W3C's decided to close down the development of HTML, in favor of XHTML.
In 2004, WHATWG (Web Hypertext Application Technology Working Group) was formed. The WHATWG wanted to develop HTML, consistent with how the web was used, while being backward compatible with older versions of HTML.
In 2004 - 2006, the WHATWG gained support by the major browser vendors.
In 2006, W3C announced that they would support WHATWG.
In 2008, the first HTML5 public draft was released.
In 2012, WHATWG and W3C decided on a separation:
WHATWG wanted to develop HTML as a "Living Standard". A living standard is always updated and improved. New features can be added, but old functionality cannot be removed.
The WHATWG HTML5 Living Standard was published in 2012, and is continuously updated.
W3C wanted to develop a definitive HTML5 and XHTML standard.
The W3C HTML5 recommendation was released 28 October 2014.
W3C also published an HTML 5.1 Candidate Recommendation on 21 June 2016.

<button> vs. <input type=“button” />. Which to use?

  • Here's a page describing the differences (basically you can put html into a <button></button>)
  • And another page describing why people avoid <button></button> (Hint: IE6)
Another IE problem when using <button />:
And while we're talking about IE, it's got a couple of bugs related to the width of buttons. It'll mysteriously add extra padding when you're trying to add styles, meaning you have to add a tiny hack to get things under control.

HTML url encode

A URL is another word for a web address.
A URL can be composed of words (w3schools.com), or an Internet Protocol (IP) address (192.68.20.50).
Most people enter the name when surfing, because names are easier to remember than numbers.

URL - Uniform Resource Locator

Web browsers request pages from web servers by using a URL.
A Uniform Resource Locator (URL) is used to address a document (or other data) on the web.
A web address, like https://www.w3schools.com/html/default.asp follows these syntax rules:
scheme://prefix.domain:port/path/filename
Explanation:
  • scheme - defines the type of Internet service (most common is http or https)
  • prefix - defines a domain prefix (default for http is www)
  • domain - defines the Internet domain name (like w3schools.com)
  • port - defines the port number at the host (default for http is 80)
  • path - defines a path at the server (If omitted: the root directory of the site)
  • filename - defines the name of a document or resource

Common URL Schemes

The table below lists some common schemes:
Scheme Short for Used for
http HyperText Transfer Protocol Common web pages. Not encrypted
https Secure HyperText Transfer Protocol Secure web pages. Encrypted
ftp File Transfer Protocol Downloading or uploading files
file   A file on your computer

URL Encoding

URLs can only be sent over the Internet using the ASCII character-set. If a URL contains characters outside the ASCII set, the URL has to be converted.
URL encoding converts non-ASCII characters into a format that can be transmitted over the Internet.
URL encoding replaces non-ASCII characters with a "%" followed by hexadecimal digits.
URLs cannot contain spaces. URL encoding normally replaces a space with a plus (+) sign, or %20.


Try It Yourself


If you click "Submit", the browser will URL encode the input before it is sent to the server.
A page at the server will display the received input.
Try some other input and click Submit again.

ASCII Encoding Examples

Your browser will encode input, according to the character-set used in your page.
The default character-set in HTML5 is UTF-8.

HTML entity (vd <  )

HTML Entities

some characters are reserved in HTML.
If you use the less than (<) or greater than (>) signs in your text, the browser might mix them with tags.
Character entities are used to display reserved characters in HTML.
A character entity looks like this:
&entity_name; OR
&#entity_number
To display a less than sign (<) we must write: &lt; or &#60;
Advantage of using an entity name: An entity name is easy to remember.
Disadvantage of using an entity name: Browsers may not support all entity names, but the support for numbers is good.

Non-breaking Space

A common character entity used in HTML is the non-breaking space: &nbsp;
A non-breaking space is a space that will not break into a new line.
If you write 10 spaces in your text, the browser will remove 9 of them. To add real spaces to your text, you can use the &nbsp; character entity.

Some Other Useful HTML Character Entities


Result Description Entity Name Entity Number

non-breaking space &nbsp; &#160;
< less than &lt; &#60;
> greater than &gt; &#62;
& dấu hiệu &amp; &#38;
" double quotation mark &quot; &#34;
' single quotation mark (apostrophe) &apos; &#39;
¢ cent &cent; &#162;
£ pound &pound; &#163;
¥ yen &yen; &#165;
euro &euro; &#8364;
© copyright &copy; &#169;
® registered trademark &reg; &#174;
Note: Entity names are case sensitive.

Saturday, September 9, 2017

HTML Layouts

HTML Layout Elements

Websites often display content in multiple columns (like a magazine or newspaper).
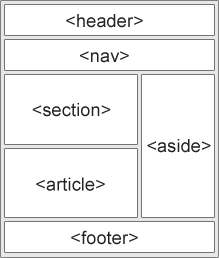
HTML5 offers new semantic elements that define the different parts of a web page:
HTML5 Semantic Elements
  • <header> - Defines a header for a document or a section
  • <nav> - Defines a container for navigation links
  • <section> - Defines a section in a document
  • <article> - Defines an independent self-contained article
  • <aside> - Defines content aside from the content (like a sidebar)
  • <footer> - Defines a footer for a document or a section
  • <details> - Defines additional details
  • <summary> - Defines a heading for the <details> element

HTML Layout Techniques

There are four different ways to create multicolumn layouts. Each way has its pros and cons:
  • HTML tables
  • CSS float property
  • CSS framework
  • CSS flexbox


Which One to Choose?

HTML Tables

The <table> element was not designed to be a layout tool! The purpose of the <table> element is to display tabular data. So, do not use tables for your page layout! They will bring a mess into your code. And imagine how hard it will be to redesign your site after a couple of months.
Tip: Do NOT use tables for your page layout!

CSS Frameworks

If you want to create your layout fast, you can use a framework, like W3.CSS or Bootstrap.

CSS Floats

It is common to do entire web layouts using the CSS float property. Float is easy to learn - you just need to remember how the float and clear properties work. Disadvantages: Floating elements are tied to the document flow, which may harm the flexibility. Learn more about float in our CSS Float and Clear chapter.


CSS Flexbox

Flexbox is a new layout mode in CSS3.
Use of flexbox ensures that elements behave predictably when the page layout must accommodate different screen sizes and different display devices. Disadvantages: Does not work in IE10 and earlier.
Learn more about flexbox in our CSS Flexbox chapter.

HTML Head (chú ý đến viewport)

The HTML <head> Element

The <head> element is a container for metadata (data about data) and is placed between the <html> tag and the <body> tag.
HTML metadata is data about the HTML document. Metadata is not displayed.
Metadata typically define the document title, character set, styles, links, scripts, and other meta information.
The following tags describe metadata: <title>, <style>, <meta>, <link>, <script>, and <base>.

The HTML <title> Element

The <title> element defines the title of the document, and is required in all HTML/XHTML documents.
The <title> element:
  • defines a title in the browser tab
  • provides a title for the page when it is added to favorites
  • displays a title for the page in search engine results
A simple HTML document:

Example

<!DOCTYPE html>
<html>

<head>
  <title>Page Title</title>
</head>

<body>
The content of the document......
</body>

</html>

The HTML <style> Element

The <style> element is used to define style information for a single HTML page:

Example

<style>
  body {background-color: powderblue;}
  h1 {color: red;}
  p {color: blue;}
</style>


The HTML <link> Element

The <link> element is used to link to external style sheets:

Example

<link rel="stylesheet" href="mystyle.css">
Tip: To learn all about CSS, visit our CSS Tutorial.

The HTML <meta> Element

The <meta> element is used to specify which character set is used, page description, keywords, author, and other metadata.
Metadata is used by browsers (how to display content), by search engines (keywords), and other web services.
Define the character set used:
<meta charset="UTF-8">
Define a description of your web page:
<meta name="description" content="Free Web tutorials">
Define keywords for search engines:
<meta name="keywords" content="HTML, CSS, XML, JavaScript">
Define the author of a page:
<meta name="author" content="John Doe">
Refresh document every 30 seconds:
<meta http-equiv="refresh" content="30">
Example of <meta> tags:

Example

<meta charset="UTF-8">
<meta name="description" content="Free Web tutorials">
<meta name="keywords" content="HTML,CSS,XML,JavaScript">
<meta name="author" content="John Doe">

Setting The Viewport

HTML5 introduced a method to let web designers take control over the viewport, through the <meta> tag.
The viewport is the user's visible area of a web page. It varies with the thiết bị, and will be smaller on a mobile phone than on a computer screen.
You should include the following <meta> viewport element in all your web pages:viewport
<meta name="viewport" content="width=device-width, initial-scale=1.0">
A <meta> viewport element gives the browser instructions on how to control the page's dimensions and scaling.
The width=device-width part sets the width of the page to follow the screen-width of the device (which will vary depending on the device).
The initial-scale=1.0 part sets the initial zoom level when the page is first loaded by the browser.
Here is an example of a web page without the viewport meta tag, and the same web page with the viewport meta tag:
Tip: If you are browsing this page with a phone or a tablet, you can click on the two links below to see the difference.


The HTML <script> Element

The <script> element is used to define client-side JavaScripts.
This JavaScript writes "Hello JavaScript!" into an HTML element with id="demo":

Example

<script>
function myFunction {
    document.getElementById("demo").innerHTML = "Hello JavaScript!";
}
</script>
Tip: To learn all about JavaScript, visit our JavaScript Tutorial.

The HTML <base> Element

The <base> element specifies the base URL and base target for all relative URLs in a page:

Example

<base href="https://www.w3schools.com/images/" target="_blank">

Bỏ qua <html>, <head> and <body>?

According to the HTML5 standard; the <html>, the <body>, and the <head> tag can be omitted.
The following code will validate as HTML5:

Example

<!DOCTYPE html>
<title>Page Title</title>

<h1>This is a heading</h1>
<p>This is a paragraph.</p>
Note:
W3Schools does not recommend omitting the <html> and <body> tags. Omitting these tags can crash DOM or XML software and produce errors in older browsers (IE9).
However, omitting the <head> tag has been a common practice for quite some time now.

HTML File Paths


PathDescription
<img src="picture.jpg"> picture.jpg is located in the same folder as the current page
<img src="images/picture.jpg"> picture.jpg is located in the images folder located in the current folder
<img src="/images/picture.jpg"> picture.jpg is located in the images folder located at the root of the current web
<img src="../picture.jpg"> picture.jpg is located in the folder one level up from the current folder

Best Practice

It is a best practice to use relative file paths (if possible).
When using relative file paths, your web pages will not be bound to your current base URL. All links will work on your own computer (localhost) as well as on your current public domain and your future public domains. 

HTML JavaScript

The HTML <script> Tag

The <script> tag is used to define a client-side script (JavaScript).
The <script> element either contains scripting statements, or it points to an external script file through the src attribute.
Common uses for JavaScript are image manipulation, form validation, and dynamic changes of content.
To select an HTML element, JavaScript very often use the document.getElementById(id) method.
This JavaScript example writes "Hello JavaScript!" into an HTML element with id="demo":

Example

<script>
document.getElementById("demo").innerHTML = "Hello JavaScript!";
</script>
 

The HTML <noscript> Tag

The <noscript> tag is used to provide an alternate content for users that have disabled scripts in their browser or have a browser that doesn't support client-side scripts:

Example

<script>
document.getElementById("demo").innerHTML = "Hello JavaScript!";
</script>

<noscript>Sorry, your browser does not support JavaScript!</noscript>
 

HTML Comments

Comment tags are used to insert comments in the HTML source code.

HTML Comment Tags

You can add comments to your HTML source by using the following syntax:
<!-- Write your comments here -->
Notice that there is an exclamation point (!) in the opening tag, but not in the closing tag.
Note: Comments are not displayed by the browser, but they can help document your HTML source code.

Conditional Comments

You might stumble upon conditional comments in HTML:
<!--[if IE 9]>
    .... some HTML here ....
<![endif]-->

Conditional comments defines some HTML tags to be executed by Internet Explorer only.

The HTML pre Element: để biểu diễn nguyên định dạng của văn bản


The HTML <pre> element defines preformatted text.
The text inside a <pre> element is displayed in a fixed-width font (usually Courier), and it preserves both spaces and line breaks:

HTML Styles: để biểu diễn các css property

The HTML Style Attribute

Setting the style of an HTML element, can be done with the style attribute.
The HTML style attribute has the following syntax:
<tagname style="property:value;">
The property is a CSS property. The value is a CSS value.
You will learn more about CSS later in this tutorial.

XHTML is HTML written as XML.


What Is XHTML?

  • XHTML stands for EXtensible HyperText Markup Language
  • XHTML is almost identical to HTML
  • XHTML is stricter than HTML
  • XHTML is HTML defined as an XML application
  • XHTML is supported by all major browsers

Why XHTML?

Many pages on the internet contain "bad" HTML.
This HTML code works fine in most browsers (even if it does not follow the HTML rules):
<html>
<head>
  <title>This is bad HTML</title>

<body>
  <h1>Bad HTML
  <p>This is a paragraph
</body>
Today's market consists of different browser technologies. Some browsers run on computers, and some browsers run on mobile phones or other small devices. Smaller devices often lack the resources or power to interpret "bad" markup.
XML is a markup language where documents must be marked up correctly (be "well-formed").
If you want to study XML, please read our XML tutorial.
By combining the strengths of HTML and XML, XHTML was developed.
XHTML is HTML redesigned as XML.

The Most Important Differences from HTML:

Document Structure

  • XHTML DOCTYPE is mandatory
  • The xmlns attribute in <html> is mandatory
  • <html>, <head>, <title>, and <body> are mandatory

XHTML Elements

  • XHTML elements must be properly nested
  • XHTML elements must always be closed
  • XHTML elements must be in lowercase
  • XHTML documents must have one root element

XHTML Attributes

  • Attribute names must be in lower case
  • Attribute values must be quoted
  • Attribute minimization is forbidden


<!DOCTYPE ....> Is Mandatory

An XHTML document must have an XHTML DOCTYPE declaration.
A complete list of all the XHTML Doctypes is found in our HTML Tags Reference.
The <html>, <head>, <title>, and <body> elements must also be present, and the xmlns attribute in <html> must specify the xml namespace for the document.
This example shows an XHTML document with a minimum of required tags:
<!DOCTYPE html PUBLIC "-//W3C//DTD XHTML 1.0 Transitional//EN"
"http://www.w3.org/TR/xhtml1/DTD/xhtml1-transitional.dtd"
>


<html xmlns="http://www.w3.org/1999/xhtml">

<head>
  <title>Title of document</title>
</head>

<body>
  some content
</body>

</html>

XHTML Elements Must Be Properly Nested

In HTML, some elements can be improperly nested within each other, like this:
<b><i>This text is bold and italic</b></i>
In XHTML, all elements must be properly nested within each other, like this:
<b><i>This text is bold and italic</i></b>

XHTML Elements Must Always Be Closed

This is wrong:
<p>This is a paragraph
<p>This is another paragraph
This is correct:
<p>This is a paragraph</p>
<p>This is another paragraph</p>

Empty Elements Must Also Be Closed

This is wrong:
A break: <br>
A horizontal rule: <hr>
An image: <img src="happy.gif" alt="Happy face">
This is correct:
A break: <br />
A horizontal rule: <hr />
An image: <img src="happy.gif" alt="Happy face" />

XHTML Elements Must Be In Lower Case

This is wrong:
<BODY>
<P>This is a paragraph</P>
</BODY>
This is correct:
<body>
<p>This is a paragraph</p>
</body>

XHTML Attribute Names Must Be In Lower Case

This is wrong:
<table WIDTH="100%">
This is correct:
<table width="100%">

Attribute Values Must Be Quoted

This is wrong:
<table width=100%>
This is correct:
<table width="100%">

Attribute Minimization Is Forbidden

Wrong:
<input type="checkbox" name="vehicle" value="car" checked />
Correct:
<input type="checkbox" name="vehicle" value="car" checked="checked" />
Wrong:
<input type="text" name="lastname" disabled />
Correct:
<input type="text" name="lastname" disabled="disabled" />

How to Convert from HTML to XHTML

  1. Add an XHTML <!DOCTYPE> to the first line of every page
  2. Add an xmlns attribute to the html element of every page
  3. Change all element names to lowercase
  4. Close all empty elements
  5. Change all attribute names to lowercase
  6. Quote all attribute values

Validate HTML With The W3C Validator

Put your web address in the box below:

Tổng quan HTML

What is HTML?

HTML is the standard markup language for creating Web pages.
  • HTML stands for Hyper Text Markup Language
  • HTML describes the structure of Web pages using markup
  • HTML elements are the building blocks of HTML pages
  • HTML elements are represented by tags
  • HTML tags label pieces of content such as "heading", "paragraph", "table", and so on
  • Browsers do not display the HTML tags, but use them to render the content of the page

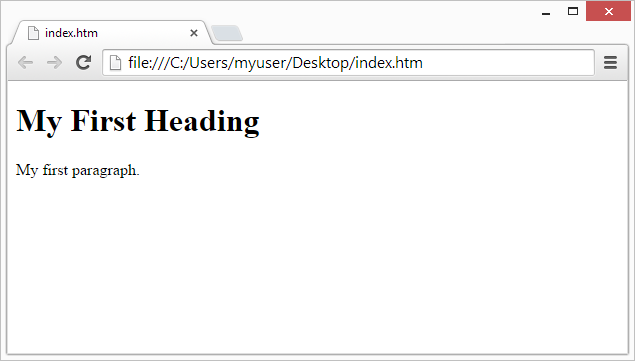
A Simple HTML Document

Example

<!DOCTYPE html>
<html>
<head>
<title>Page Title</title>
</head>
<body>

<h1>My First Heading</h1>
<p>My first paragraph.</p>

</body>
</html>

Example Explained

  • The <!DOCTYPE html> declaration defines this document to be HTML5
  • The <html> element is the root element of an HTML page
  • The <head> element contains meta information about the document
  • The <title> element specifies a title for the document
  • The <body> element contains the visible page content
  • The <h1> element defines a large heading
  • The <p> element defines a paragraph

HTML Tags

HTML tags are element names surrounded by angle brackets:
<tagname>content goes here...</tagname>
  • HTML tags normally come in pairs like <p> and </p>
  • The first tag in a pair is the start tag, the second tag is the end tag
  • The end tag is written like the start tag, but with a forward slash inserted before the tag name
Tip: The start tag is also called the opening tag, and the end tag the closing tag.


Web Browsers

The purpose of a web browser (Chrome, IE, Firefox, Safari) is to read HTML documents and display them.
The browser does not display the HTML tags, but uses them to determine how to display the document:
View in Browser

HTML Page Structure

Below is a visualization of an HTML page structure:
<html>
<head>
<title>Page title</title>
</head>
<body>
<h1>This is a heading</h1>
<p>This is a paragraph.</p>
<p>This is another paragraph.</p>
</body>
</html>
Note: Only the content inside the <body> section (the white area above) is displayed in a browser.

The <!DOCTYPE> Declaration

The <!DOCTYPE> declaration represents the document type, and helps browsers to display web pages correctly.
It must only appear once, at the top of the page (before any HTML tags).
The <!DOCTYPE> declaration is not case sensitive.
The <!DOCTYPE> declaration for HTML5 is:
<!DOCTYPE html>

HTML Versions

Since the early days of the web, there have been many versions of HTML:
Version Year
HTML 1991
HTML 2.0 1995
HTML 3.2 1997
HTML 4.01 1999
XHTML 2000
HTML5 2014